'82 R100RS 1MK Restoration

Discuss all things 1970 & later Airheads right here.
audiowize
Posts: 71
Joined: Sun Feb 09, 2014 10:07 pm

Re: '82 R100RS 1MK Restoration

Post by audiowize »

PAS wrote:All I know is that it is different then regular fiberglass and requires an epoxy based repair.
For repair of fiberglass, epoxy based resins are always preferred.

Unfortunately, a lot of folks like to use the chopped fiberglass mat for their repairs, and this is rarely epoxy compatible.

If you are using woven cloth, then epoxy will work well, and it will always adhere better to the fiberglass parts. (Normal FG polyester resins shrink a fair amount when they cure, so and bonding that might happen along the way is compromised)
Toga
Posts: 151
Joined: Mon Jul 01, 2013 10:37 pm
Location: Tweed Hinterland, Australia

Re: '82 R100RS 1MK Restoration

Post by Toga »

Thanks for that info, audiowize.

It appears the product I got is in fact an epoxy resin.
When I asked about the differences between the chopped f'glass mat & the woven mat I was told that for my needs, the chopped mat would be best... im a bit confused now.

None the less, the work is done & I cant find any info on strength, safety or longevity of repair that suggests I should re-do it, so Ill leave it as is & carry on.
Major Softie
Posts: 8900
Joined: Tue Aug 03, 2010 1:46 pm

Re: '82 R100RS 1MK Restoration

Post by Major Softie »

Toga wrote:None the less, the work is done & I cant find any info on strength, safety or longevity of repair that suggests I should re-do it, so Ill leave it as is & carry on.
Sadly, it's likely you'll have to redo it. Probably on the 2MK service.
MS - out
audiowize
Posts: 71
Joined: Sun Feb 09, 2014 10:07 pm

Re: '82 R100RS 1MK Restoration

Post by audiowize »

Yeah, there are a few rare types of mat that will work with epoxy. The issue with the chopped mat is that it's glued together with a glue that is essentially soluble in polyester resin. So, when you brush your resin over it, the glue becomes a non-issue. When you brush epoxy over, you will end up with epoxy, then glue, then the mat.

The mats that are glued together with epoxy soluble glues will be labeled as such, and more expensive.
User avatar
Ken in Oklahoma
Posts: 3182
Joined: Tue Aug 03, 2010 5:10 pm

Re: '82 R100RS 1MK Restoration

Post by Ken in Oklahoma »

Here is a link that was posted on Boxerworks some time ago regarding fiberglass, especially the type of fiberglass that BMW used for their fairings and other parts. I copied the article and saved it to my computer. But I see that the article is still on the internet.

I followed the recommended regimen when doing fiberglass repair on a couple S fairings. The repairs came out fine, thought I haven't actually painted the fairings yet and put them to use. So the recommendations remain "unproven" for me. Still the article made so much sense that I am putting some stock in it, especially because it addresses the kind of fiberglass used in our fairings.

The article:

http://www.fibreglast.com/product/fiber ... ite-repair


Ken
____________________________________
There's no such thing as too many airheads
ME 109
Posts: 7306
Joined: Tue Aug 03, 2010 3:00 am
Location: Albury, Australia

Re: '82 R100RS 1MK Restoration

Post by ME 109 »

Major Softie wrote: Sadly, it's likely you'll have to redo it. Probably on the 2MK service.
Very good Major.
Lord of the Bings
Toga
Posts: 151
Joined: Mon Jul 01, 2013 10:37 pm
Location: Tweed Hinterland, Australia

Re: '82 R100RS 1MK Restoration

Post by Toga »

That is a good article, Ken.

It was one of the first I read last night when googllling SMC.
That info made me feel a bit more comfy about the resin & process's I used.

I have to mention, that during my prep work, I did not see any indication of the 'fibrous layers' mentioned in the "Structural Repair Sequence" section 2... perhaps that is not a reference to SMC.

audiowize, your comment of "epoxy, then glue, then the mat" makes sense with the different glues used and adds to the confusion a little.
The chopped matting I used appears to have almost no glues and is almost woven by comparison to the no name hardware brand I saw that clearly was held together by glue. The woven matting I was shown had much more of a flexible fabric type texture.

All in all, im with Major... I reckon it will last reasonable well. Paint it up & time will tell.
- unless I skittle a roo.
Toga
Posts: 151
Joined: Mon Jul 01, 2013 10:37 pm
Location: Tweed Hinterland, Australia

Re: '82 R100RS 1MK Restoration

Post by Toga »

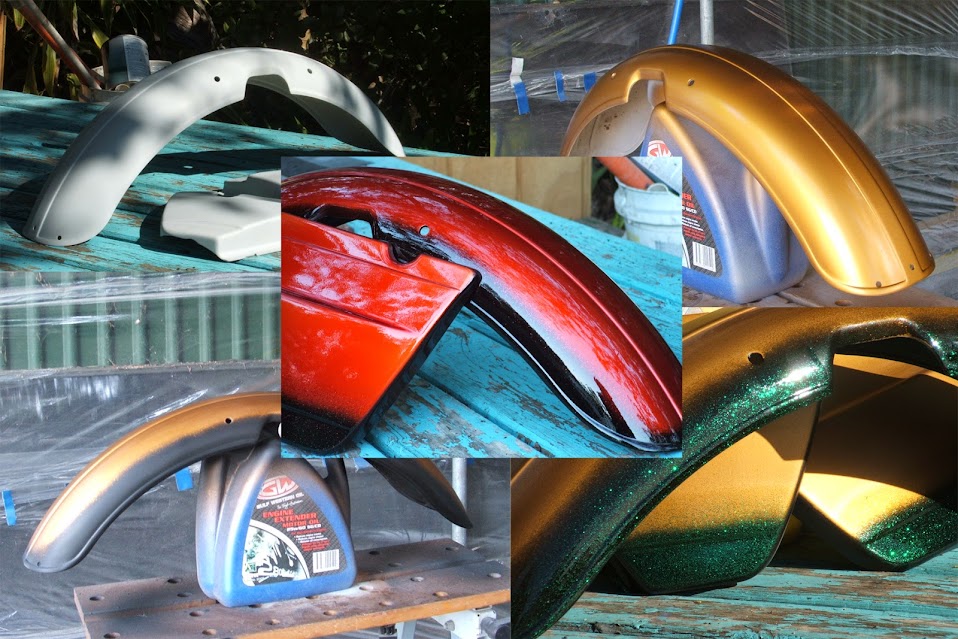
Well the past 3-4 days has been a huge learning curve of technique, style & application of DIY spray painting.
It enforces the admiration & respect I have for all pro's of their respective fields.

This whole stage was an experiment as I wanted to see the results on an actual piece or 3.
This is my 1st ever attempt at custom blend spray painting...

Image

I am not happy with the result and will strip it back tomorrow.
I have learned much that will be applied on the next attempt.
Major Softie
Posts: 8900
Joined: Tue Aug 03, 2010 1:46 pm

Re: '82 R100RS 1MK Restoration

Post by Major Softie »

Can't wait to see your successful attempts!
MS - out
Toga
Posts: 151
Joined: Mon Jul 01, 2013 10:37 pm
Location: Tweed Hinterland, Australia

Re: '82 R100RS 1MK Restoration

Post by Toga »

Haha, thanks Major.
It might look a nice colour, shinny -n- all... but in person it really does not cut the mustard. The flaws are numerous and the finished colours are not what I desire.
I sort of rushed my self trying to make the best of the warm and dry weather that week.

Layer 1 - Unlike the gloss black of the frame, micro pin holes in the primer stand out like dogs balls under the metallic gold & candy red clear.
Solution = more & better detailed inspection during prep.
Layer 2 - Premature sanding of the gold left unremovable scuff marks.
Solution = Double the curing time for gold & use a finner grade sand paper, 1000grit.
Layer 3 - The matt black underside's & edging... well that was a total cockup !
I used the wrong spray nipple size, wrong mixing / thinning ratio, wrong spray pattern's, wrong air pressure, wrong time of day (rushed it in late in arvo being overly eager)... then it sanded like shit in the morning because of the previous 'wrong' ... yep, a total cockup.
Solution = Pay attention this time and do it properly :roll:
Layer 4 - Followed the mix recommendations for the green but it was no where near enough, requiring far to many coats to get less than 30% of desired colour depth... thus leaving a very 'thick edge' drop to the gold subsurface, which then stands out like kangacrap after the final layer ...
Solution = Quad damage dose of green on next mix... I think a different spray nipple size than I used will also benefit greatly.
Layer 5 - Again, followed mix instructions for the candy red ... and got the same pale result, also requiring far to many coats to get some colour happening... also used the wrong spray pattern creating some lovely 'tiger stripes' to the colour density.
Far to many coats creates an 'orange peel' surface texture that is built upon with each coat, while you can sand & buff the surface to a bowling ball smooth finish.. the orange peel ripples are still evident within the colour depth.
Solution = Quad damage dose of candy red on next mix & wider spray pattern with broader overlap of passes.

Yes, no one can be a harsher critic than oneself.
Post Reply